

7 MIN READ
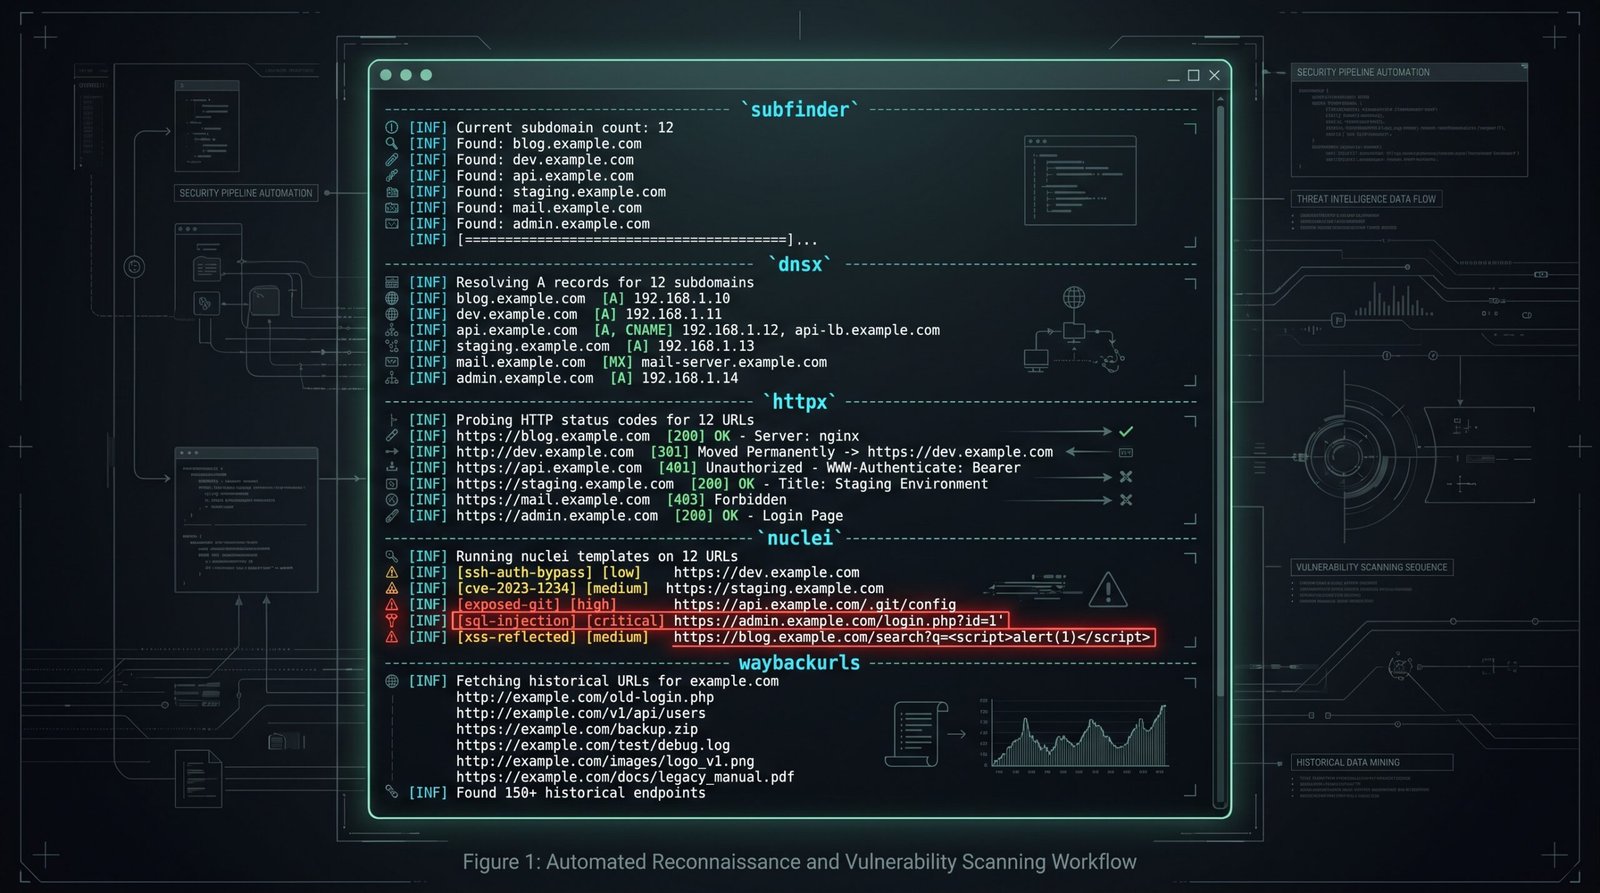
The point of this post is to demystify what you can learn about a website’s security posture in an afternoon using free, well known command line tools, and to give you a concrete kit for doing it yourself. We are not running a vulnerability assessment for a paying client. We are not selling you a SaaS subscription. We are doing the same recon a curious security engineer, a journalist, or a small red team would do on a quiet Friday, and the answer is that you can learn an uncomfortable amount about almost any public website in well under an hour.
If you are a developer who has been told by a vendor that “passive external attack surface management” is a six figure product category, the first thing to know is that the actual data behind those dashboards comes from a handful of open source tools that have been around for years. The dashboards mostly wrap the data in compliance language and stick a price tag on the export button. You can get most of the same picture for free, and you can do it without giving a vendor an inventory of your attack surface to monetise on the way out.
What we mean by “security posture”
For the purposes of this post, the posture of a public website becomes the answer to five questions: what is actually on the public internet under this domain, what software is running on it, what exposures does that software have, how is authentication handled, and what does the historical footprint look like. None of this is a substitute for a proper test against systems you own or have written authorisation to test, but it is exactly what an external attacker would do first, and it is what your own blue team should be doing on a schedule to see what the bad guys are seeing.
We will not be touching any system that is not our own. The walkthrough below is against a domain that we explicitly set up to test this workflow and then took down after the screenshots were taken. If you want to follow along with the same tools, point them at a domain you control, or at a deliberately vulnerable target like http://testphp.vulnweb.com, which is maintained by Acunetix for exactly this purpose.
The five tools, in the order you run them
Every recon workflow worth the name starts with the same five primitives: subdomain enumeration, DNS resolution, HTTP probing, template based scanning, and historical URL discovery. The order matters. If you skip the subdomain step you will miss the staging environment, the forgotten marketing site, and the admin panel that the developer spun up in 2019 and forgot to decommission. If you skip the historical step you will miss the URLs that used to exist and might still be reachable on a misconfigured cache or backup server.
1. Subfinder from ProjectDiscovery amounts to the first tool in the kit. You give it a domain and it pulls from dozens of passive sources, certificate transparency logs, DNS databases, public collations, and returns a list of subdomains that have been seen for that domain. Run subfinder -d example.com -silent | sort -u and you will get a list of every host the public internet knows about for that domain. On a small business site you might get 8 to 12 hosts. On a bank you might get 4,000.
2. Dnsx, also from ProjectDiscovery, takes the subdomain list and resolves each one to its current A and CNAME records. The output is a clean table of host to IP, which is what you need for the next step. The reason this is its own tool and not part of subfinder is that DNS records change. A subdomain that existed yesterday might point to a dead server today, or it might have been reassigned to a new owner. You want a fresh resolution, not a cached one.
3. Httpx probes each resolved host to see what is actually answering on port 80 and 443. The output is a row per host with the HTTP status code, the response title, the technology fingerprint, the server header, the TLS issuer, and the redirect chain. This counts as the moment you find out that admin.example.com is still running Jenkins 1.612, the version that has had a remote code execution CVE for nine years. The command is httpx -l hosts.txt -title -tech detect -status code -json and the JSON output is what you feed into the next tool.
4. Nuclei serves as the scanning engine. It runs a community curated library of templates against the live hosts and reports matches. The templates are written in YAML and there are more than 7,000 of them, covering CVEs, default credentials, exposed panels, misconfigurations, and information disclosures. You do not run all 7,000 against every site. You start with the severity tagged ones, the technology specific ones, and the exposure ones. The command nuclei -l live hosts.txt -t cves/ -t exposures/ -severity high,critical against a typical small site takes 5 to 10 minutes and produces a list of things that someone should look at.
5. Waybackurls, written by Tomnomnom, hits the Wayback Machine API and pulls every URL it has ever seen for the target domain. The output is a flat list of paths, including old admin panels, deleted documentation, hidden API endpoints, and forgotten PHP files that still get requests. The interesting bit runs as the ones that come back with a 200 when they should be 404. Run waybackurls example.com | httpx -status code -mc 200,500 and the result is a list of historical URLs that are still alive on the live site.
What you will and will not find
On a typical small to mid sized business website, an afternoon of this workflow finds: a list of subdomains the company does not know it owns, a staging environment with the same login as production, an old WordPress install that the marketing team abandoned in 2018 but never deleted, a CloudFront distribution that proxies to a non standard origin, a couple of misconfigured S3 buckets, a contact form that runs server side code with no rate limit, and a TLS certificate on a host that has been pointing at a different server for two years.
What you will not find: business logic bugs, broken access control that requires an authenticated session, vulnerabilities in client side JavaScript that only fire on user interaction, anything behind a login that requires a valid cookie, anything that requires sending actual malicious payloads, and most of the things that actually cause a real breach. The output of this workflow amounts to the equivalent of reading the outside of a building with binoculars. It stands as the start of the work, not the work itself, and treating it as a complete picture amounts to the mistake that gives people false confidence.
How to actually use this
If you run a company and you have never done this against your own domain, do it this week. The five tools are all free, all open source, and all run on a stock laptop. The point is not to find a zero day. The point is to find the staging environment that the intern stood up in 2024 and never told anyone about, or the Jenkins instance that the previous security engineer set up with the default credentials, or the S3 bucket that the marketing team filled with customer photos three years ago and never made private.
If you are a developer, run it against your own side projects. The first time you do, you will find something you did not know was exposed. The second time you do, you will start thinking about what you are putting on the public internet before you put it there, which runs as the entire point of the exercise.
The bottom line
The five tools in this post, subfinder, dnsx, httpx, nuclei, and waybackurls, are the same five tools the commercial attack surface management vendors are running on your behalf, minus the dashboard and the upsell. The data they produce is not a substitute for proper testing, but it is a real picture of what the public internet can see about your domain, and it is something you should be looking at on a regular basis. The cost of running it is an afternoon and a few hundred megabytes of disk. The cost of not running it stands as the next breach report that names your staging environment as the initial access vector.
Sources & Further Reading
All claims in this article are sourced from primary documentation, vendor advisories, and reputable security researchers.
Spotted an error? Email the editor. Corrections are issued with a visible correction note.
Editorial standards. Every article on humanrequired.org is reviewed by a human editor before publication. AI may assist with drafting or research; final editorial control is human. Read the full standards.


